
Carol Shahbaz
-
Creating a Useful and Reusable Transfer Sheet
1. Begin with a sheet of vellum. Make it a size that works with your typical drawing and painting formats. (I have multiple sizes.) Wrap the edges with scotch tape and fold it over the edges. This prevents the sheet from being accidentally torn.
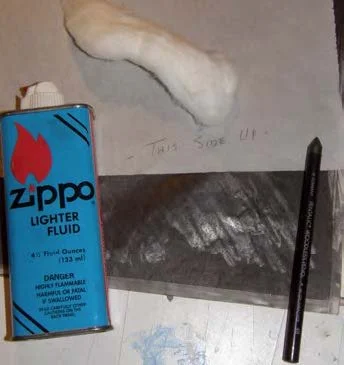
2. Coat one side of the vellum using a 6B or 9B graphite stick, making sure to use strokes in all directions.
3. Using a cotton ball and lighter fluid, squirt lighter fluid on the graphite vellum side and rub the surface with the cotton ball. Immediately, the vellum will become smooth. Your transfer sheet is now ready to use.
4. I buy my drafting vellum in large rolls. I cut a sheet of vellum twice the size of my transfer sheet and fold it in half to store my newly made graphite transfer sheet. This prevents marks being made on other works when stored in my flat files. Write “This side up!” on the Vellum storage sheet so you know to keep the graphite side facing up.
-
Working With Vellum
During my first semester, one of my art professors gave me the book The Pencil by Paul Calle, a well-known illustrator. Calle’s book influenced me greatly, and I admired his style for developing drawings on vellum. I have since worked using multiple layers of vellum to build and redesign my drawings for paintings, using this technique for over 35 years.
What I like about vellum: I can draw multiple images that are meant to be used in one final design… even if their proportional sizes might be off for my end goal – I can take my pencil drawings to my local printer and have them print black and white architectural prints in various sizes. (Typically, this costs me between $4 to $6 a print, depending on how large a print I want and need.) For example, I might wish to have one image increased in size by 25% and another reduced by 10%, so when I overlap the different pictures with vellum, my design becomes more cohesive and makes more sense to me.
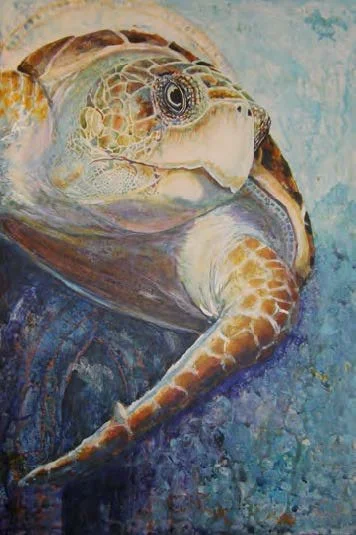
Example: I love drawing and painting marine life, especially sea turtles. I drew a large sea turtle on vellum. Then, I drew an image that I had taken outside of Sienna, Italy, of a man doing masonry work 60 feet up in an old abandoned cathedral window.
1. I taped down the vellum drawing of my construction worker onto my drafting board.
2. I then placed my vellum drawing of a sea turtle over it.
3. I placed a blank sheet of vellum over my two drawings and began to draw and merge the two images together. Yes… this was a time consuming process, but the result was well worth it.
Now, I am ready to trace my drawings onto either watercolor paper, canvas, or Clayboard.
-
Creating Texture With Unorthodox Methods
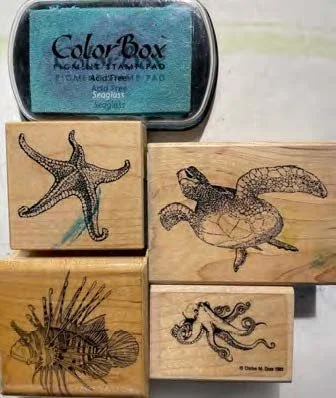
Using Rubber Stamps – I learned the value of using rubber stamps in my background while taking Lithography/Printmaking. I have an extensive collection of sea turtles, snails, shells, whales, dolphins, and octopus rubber stamps. You can stamp them onto your blank canvas, overlapping the images or stamping singular images in a random format. They may or may not be a part of your overall design. I use them as surprises for the clients who own my work.
Rubbing Alcohol – Put Rubbing Alcohol in a bottle with a spray top. When your watercolor/acrylic wash is still damp… spritz it with Rubbing Alcohol to get a unique texture and ALLOW IT TO DRY!!!! You cannot undo it!!!! But this method does give a one-of-a-kind texture. When your surface is dry, continue painting as you normally would. The dry alcohol cannot be reactivated. However, if you wish to add more washes to your surface… You can spritz it again with the alcohol, creating even more texture on your surface. ***The Rubbing Alcohol will not disturb any images you may have stamped onto your paper/canvas. This method is not for the faint of heart.
Electric Flat Sanders – If you are using a gessoed surface on any Masonite board or Ampersand/Clayboard, you can try this next Trick of mine. When you have been painting awhile and think you might have thrown too much paint or color on your canvas…take an electric sander to it. **Remember, I have a Fine Arts Degree… which means that I was taught a lot of esoteric bovine manure in various schools and art styles. Deconstruction was one philosophy I was taught in the 90s. So… I took a belt sander to one of my works and deconstructed it! I was pleased with what I could do to enhance my paintings. You can selectively sand back down to the white gessoed surface of your canvas and incorporate that as part of your finished piece. I find it fun to pour on colors, inks, and rubber stamps to my heart’s content.
Designing Fish – When I photograph Koi, I can never get the fish to hold still long enough to get an interesting composition. I might ask the fish politely, “Hold still, please, and smile!” But they never do. My solution: On separate pieces of vellum, I draw as many individual koi in different shapes, sizes, and scale patterns as possible. I have over 50 individual drawings of Koi, and I constantly create more. Sometimes, I color some of them with Col-erase pencils just for contrast when I do layouts with them. I can create numerous compositions with these individual drawings combined with the many waterlilies and lotuses I have drawn on vellum.